Personalizar o menu do SharePoint 2013 e Office 365

The site menu is where the user get his focus when he wants to navigate in a web site, in this article I’ll teach you how add icons to it to make the navigation more intuitive.
The default SharePoint menu does not accept any html, it just work with plain text but with the use of the Reusable Content List and a custom script we can change this behavior.
O menu é o local onde o utilizador centra a sua atenção quando pretende navegar num site, neste artigo vou-te explicar como adicionar ícones ao menu para tornar a navegação mais intuitiva.
Por omissão o menu do SharePoint não aceita nenhum HTML, apenas funciona com texto mas com o uso da lista Reusable Content e um script personalizado podemos alterar este comportamento.
A few considerations before we start:
1 – This article is specific for the Bind Menu and will only work with the Bind Tuning themes
2 – The icons used are from the Font Awesome that is included in the themes
3 – You don’t have a Bind Tuning theme? Well you can download one form here.
Algumas considerações antes de começar:
1 – Este artigo é específico para o Bind Menu e apenas funciona com temas do BindTuning
2 – Os ícones utilizados são do font-awsome que está incluído nos temas
3 – Não tens um tema BindTuning? Podes fazer download aqui.
The Reusable Content List
The Reusable Content list is a collection of content that you create for your site collection that is stored as items in a list. Each item of reusable content can consist of either HTML or plain text and can be designated as either automatically updated or not.
Reusable content that consists of HTML can contain text and HTML elements, such as images and icons. These HTML elements can be styled or formatted as needed.
You can use reusable content to create branded HTML items that need to be exactly the same across your site collection, such as the icons for the menu.
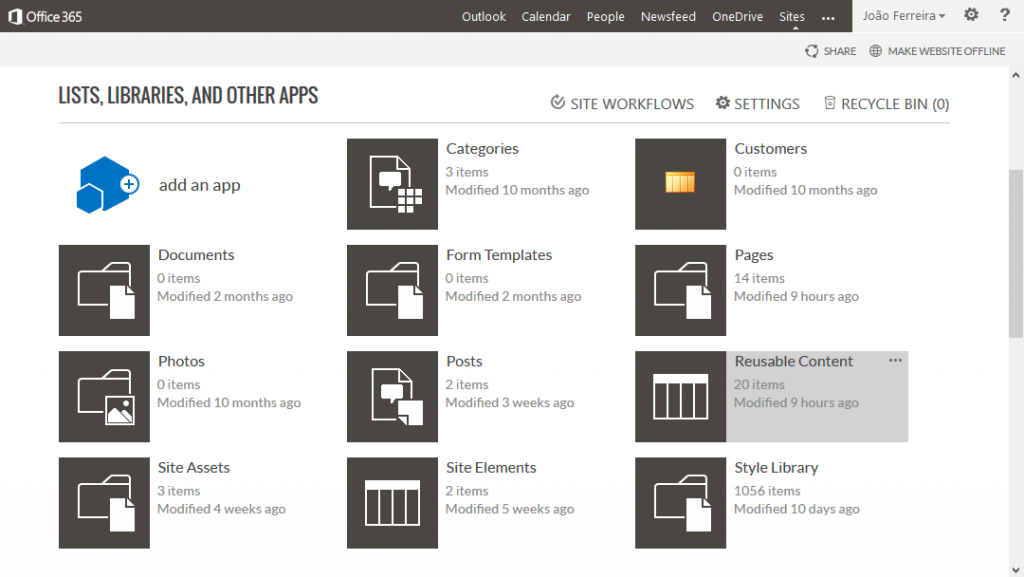
To open the Reusable Content list on your SharePoint site go to Settings –> Site Contents and click on the Reusable Content tile to Open it.
A lista Reusable Content
A lista Reusable Content é uma colecção de conteúdos que podes criar para a tua site collection e que são armazenados como itens de uma lista. Cada item da lista pode ser constituído por HTML ou apenas texto.
Os itens definidos em HTML podem ser ícones, imagens ou qualquer outro código e podem simultaneamente ser formatados com CSS se necessário.
Podes usar o Reusable Content para criar padrões que se repetem em todos os sites da site collection como é o caso dos ícones do menu.
Para abrir a lista de Reusable Content no teu site de SharePoint vai a Settings -> Site Contents e clica no quadrado Reusable content para abrires a lista.
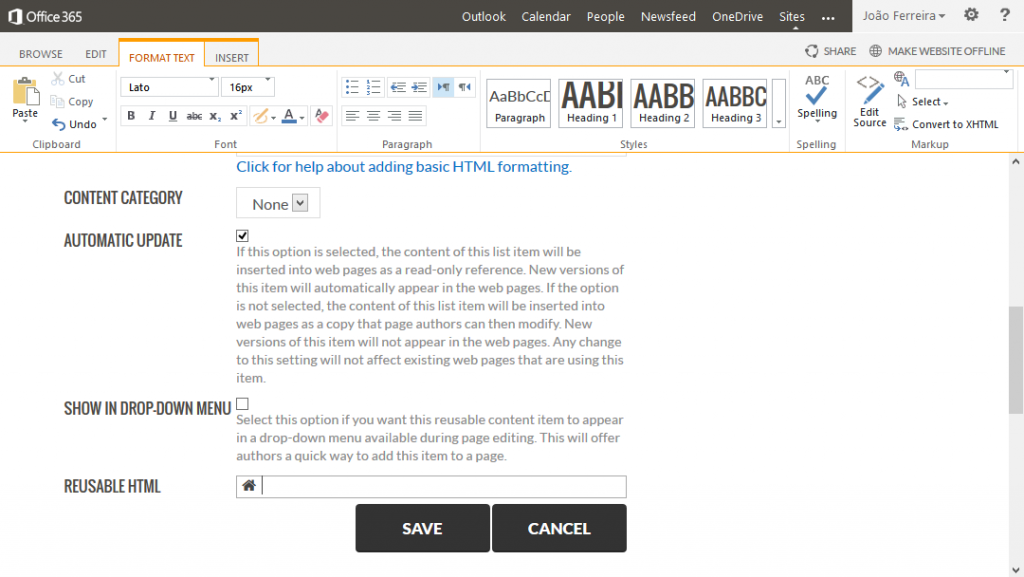
At the top of the list click in the New Item option, this will open a new form where you can introduce the details for the menu items.
In the title field type the name of the Menu, in the reusable html field click to add the html for the icon, once the text box got focus click in the Edit Source option in the tool bar it is located in the Format Text tab.
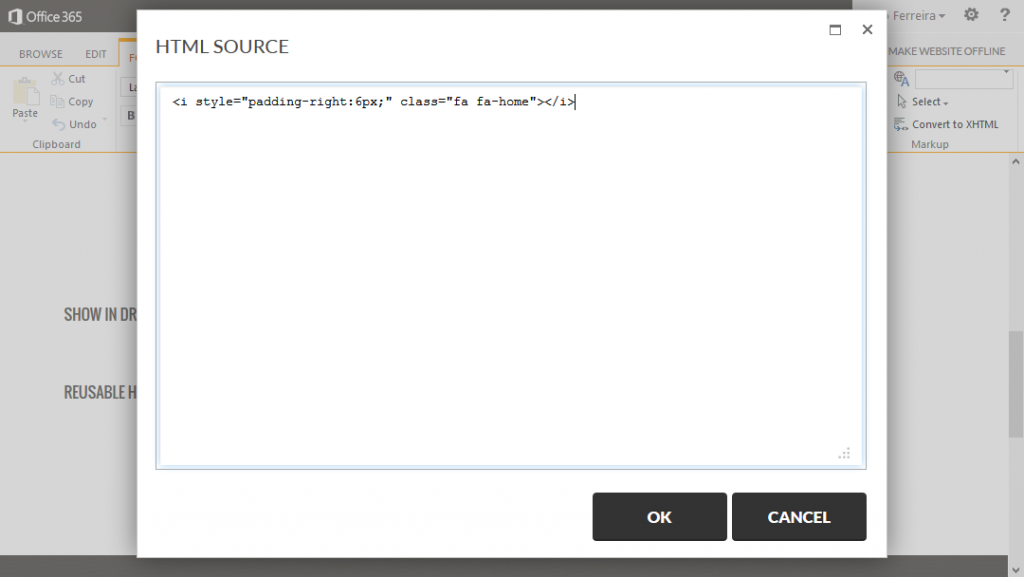
In the HTML Editor you should put the code for the icon something like the example bellow.
No topo da lista clica na opção New Item, lista opção vai abrir um novo formulário onde podes introduzir os detalhes para os ícones do menu.
No campo title escreve o nome do menu, clica no campo reusable html para adicionar o código para o ícone, assim que a caixa de texto esteja seleccionada clica na opção Edit Source na barra de ferramentas.
No editor HTML deves colocar o código para o ícone, algo como exemplo em baixo.
<i style="padding-right:6px;" class="fa fa-home"></i>
Before you save it make sure that you can see the icon in the Reusable HTML field, if you see the html code you missed the Edit Source step described above.
Antes de guardares as alterações confirma que consegues ver o ícone no campo Reusable HTML, se vires o código HTML então falhas-te o passo do Edit Source descrito em cima.
Repeat this process for all the menu items where you want to have an icon.
Add the custom script
To append the icons to the menu we will need a custom script that will read the icons from the list.
1 – Open your site with the SharePoint designer
2 – Go to All Files –> Style Library –> YOUR THEME NAME -> JS
3 – In the tool bar click File –> Java Script
Adicionar o script personalizado
Para adicionar os ícones ao menu vamos necessitar de um scrip que leia os ícones da lista.
1 – Abre o teu site com o SharePoint designer
2 – Vai a All Files -> Style Library -> O NOME DO TEU TEMA -> JS
3 – Na barra de ferramentas clica em File -> Java Script
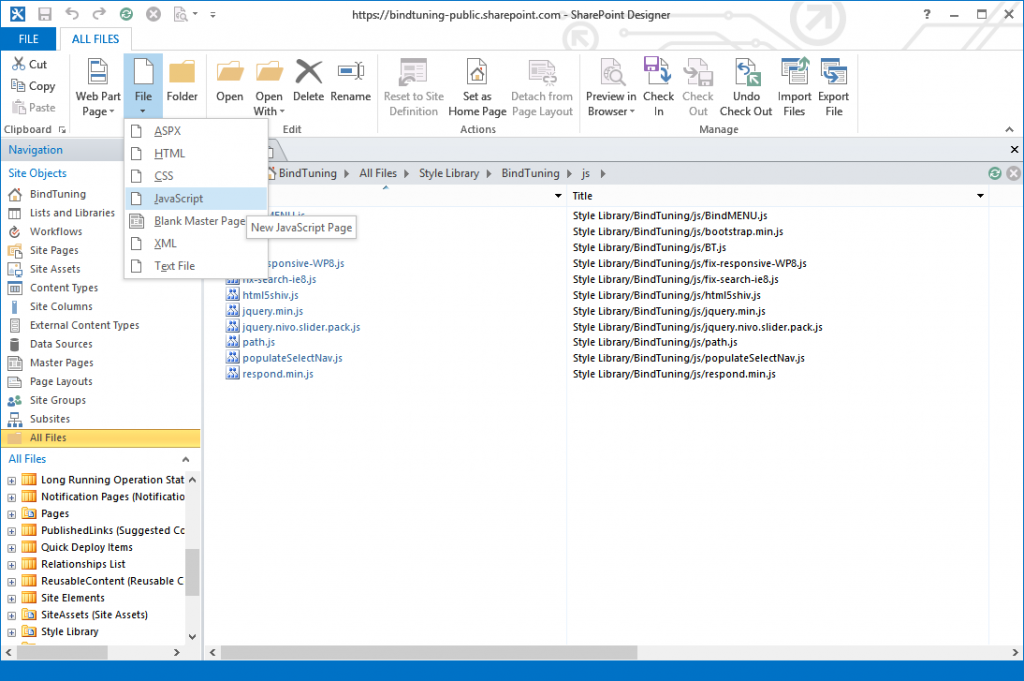
4 – Name it menuIcons.js
5 – Right click on it, check out the file and edit it in advanced mode
6 – Copy the code bellow and paste it in the new file
4 – Dá o nome menuIcons.js ao ficheiro
5 – Clica no ficheiro com o botão direito do rato, faz check out e edita-o em advanced mode
6 – Copia o código em baixo e cola-o no novo ficheiro
(function ($) {
	$(document).ready(function () {

	//Get Elements from the Reusable Content list
	var url = document.URL;
	if(url.indexOf("https://") != -1)
	{
		var urllink = document.location.href.replace("https://","");
		var prefix = "https://";
	}
	else
	{
		var urllink = document.location.href.replace("http://","");
		var prefix = "http://";
	}

	var link;
	if(urllink.indexOf("sites")!=-1)
		link = (urllink.split("/"))[0]+"/"+(urllink.split("/"))[1]+"/"+(urllink.split("/"))[2];
	else
		link = (urllink.split("/"))[0];

	var soapEnv =
		"<soapenv:Envelope xmlns:soapenv='http://schemas.xmlsoap.org/soap/envelope/'> \
			<soapenv:Body> \
				 <GetListItems xmlns='http://schemas.microsoft.com/sharepoint/soap/'> \
					<listName>Reusable Content</listName> \
				</GetListItems> \
			</soapenv:Body> \
		</soapenv:Envelope>";

		$.ajax({
			url: prefix+link+"/_vti_bin/lists.asmx",
			type: "POST",
			dataType: "xml",
			data: soapEnv,
			complete: processResult,
			contentType: "text/xml; charset=\"utf-8\""
		});


	var listNames = new Array();
	var icon = new Array();

	function processResult(xData, status) {
		$(xData.responseXML).find("z\\:row, row").each(function()
		{
			listNames.push($(this).attr('ows_Title'));
			icon.push($(this).attr('ows_ReusableHtml'));

		});

		$('.menu-item-text').each(function()
		{
			for (var i=0; i<icon.length; i++)
			{
				if($(this).text().toString().toLowerCase() == listNames[i].toString().toLowerCase())
				{
					$( this ).html(icon[i] + $(this).text());
				}
			}
		});
	};
	});
})(jQuery);
7 – Save the file, check it in and if asked publish the major version
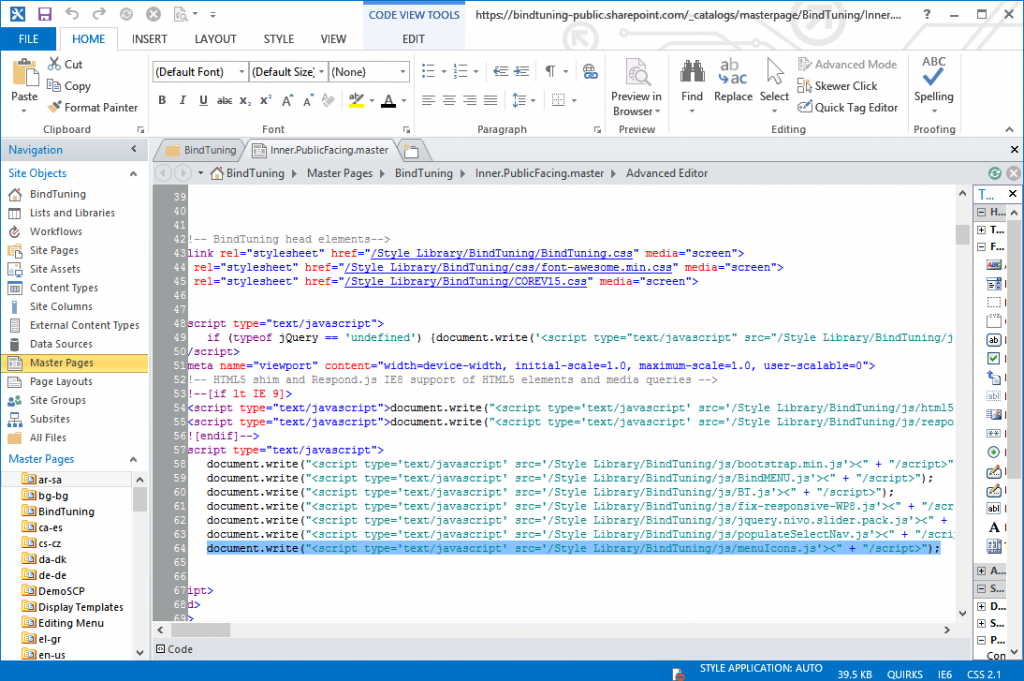
8 – Go To All Files -> _catalogs -> masterpage -> YOUR THEME NAME
9 – Check out and edit in advanced mode the master page you are using
10 – At the top of the master page locate the block where the scripts are defined and add a new line for the menuIcons.js
7 – Grava o ficheiro, faz check in e se necessário selecciona a opção publish major version
8 – Vai a All Files -> _catalogs -> masterpage – > O NOME DO TEU TEMA
9 – Faz check out e edita em advanced mode a master page que estás a utilizar
10 – Localiza no topo da master page o sitio onde estão definidos os scripts e adiciona uma nova chamada ao menuIcons.js
11 – Save it, check it in and if asked publish the major version
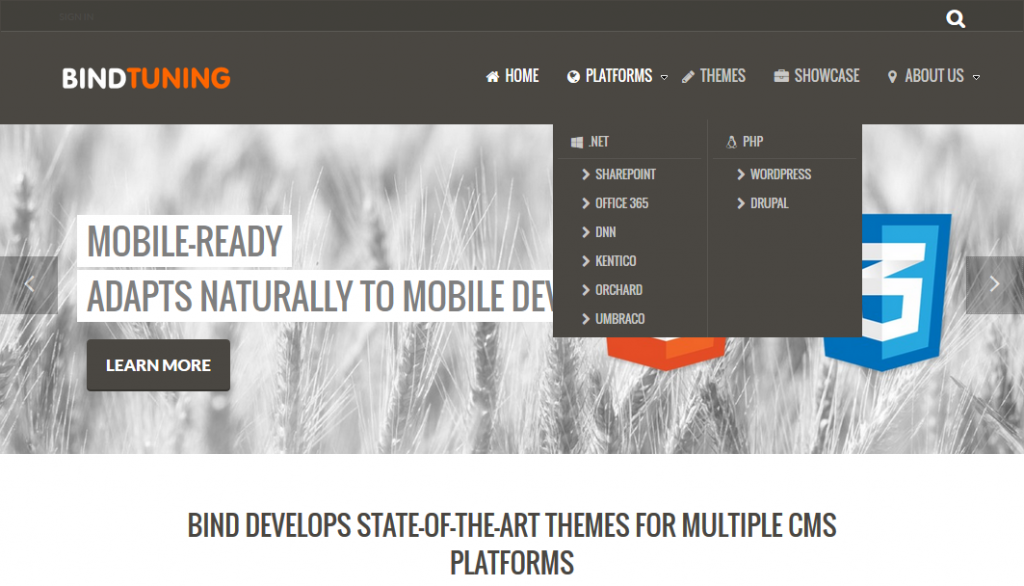
If everything went well the final result should be similar to this.
11 – Grava o ficheiro, faz check in e se necessário selecciona a opção publish major version
Se tudo correu bem o resultado final deve ser semelhante ao da figura em baixo.